Wednesday, February 27, 2013

Sinful Colors Sugar Rush + Candy Lacquer Sugar Skulls


Sinful Colors Sugar Rush

Sugar Rush is a powder blue creme and took 3 coats to become opaque. The brush was cut unevenly so I couldn't make crisp lines. The formula was creamy and easy to apply. Though the first coat was sort of sheer, the opacity build up with the second coat. The third coat was applied to cover up some patches. It leveled out well, drying in an average length of time and with a nice shine.


Candy Lacquer Sugar Skulls

Sugar Skulls contains "white and pink hearts mixed with golden yellow flowers and various sizes of hex glitters in white, pink, teal, golden yellow, pale green and opal". I layered it over Sinful Colors Sugar Rush. I fell in love with Sugar Skulls after seeing Kellie Gonzo's swatch and ended up stalking Candy Lacquer's site until I purchased it. The base wasn't thick so the application wasn't as troublesome as it could have been. I had to fish for the flower and heart glitters, but couldn't get any of the white hearts. The unusually shaped glitters didn't lie flatly on the nail. (They might if you have flat nails though.) Fortunately, they didn't catch on anything. To get a more uniform look, I had to place the glitter myself. Dabbing was necessary and made the dry time slow. I used top coat here to smooth the surface. Even though there were clearly application problems, I still very much adore Sugar Skulls.

Description from Candy Lacquer. You can purchase Sugar Skulls here.

See you guys on the other side of the day!

Michelle 
Monday, February 25, 2013

Now on Facebook!

Le Lacquer Hook Up is now on facebook!


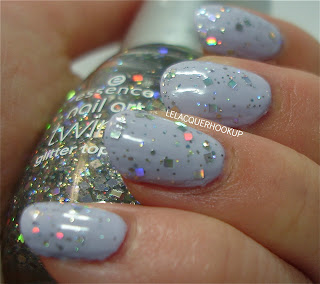
Revlon Cloud + Essence Julia

For the next two weeks (with the exception of today), I'll be posting some of my indie polishes. I really loved them, and I hope you guys will too! :)


Revlon Cloud

Cloud is a pale periwinkle creme. 3 coats. I don't know why it was in my untrieds mountain for so long because it's such a pretty color! However, the formula left much to be desired. It was watery, but was neither thin nor thick. The first coat was a bit sheer; opacity built up with each additional coat. To top it all off, Cloud didn't level well either. However, I bought this about 2 or so years ago. I think Revlon might have improved the formula because my replacement for Jaded (also from the same Top Speed line) had a much better formula than my first one, which I bought at the same time as Cloud. I bought the replacement a week ago. Anyway, contrary to the fast-drying claim, Cloud dried in an average to slow length of time. It dried with a nice gloss.


Essence Julia

Julia is an enchanting mix of holographic silver small square and small and fine hex glitter. I layered 1 coat over Revlon Cloud. The combination was SO pretty and delicate! I didn't want to remove it, but I had to for swatching purposes. :( Anyway, the formula was really nice. Fishing for glitters wasn't necessary. I did have to dab a little though. It also dried slowly. As far as I know, the Essence Nail Art Glitter Toppers were never released in the U.S. I'm so lucky I got Julia from a blog sale! If I can find another bottle, I'll definitely purchase it. Julia is back-up worthy!

See you guys on the other side of the day!

Michelle

Monday, February 18, 2013

Zoya Song


Zoya Song


Song is a sapphire blue with flakie-shimmer. I looove this gem! It reminds me of the night sky! (Unless you have light pollution, of course.) 2 coats. Like my other Zoyas, the formula on this one was also lovely. Song glided on and was very pigmented. An effortless beauty! It dried with a nice shine and in an average amount of time. Song rekindles my love for blues. I really did not want to take her off!

See you guys on the other side of the day!

Michelle

Sunday, February 17, 2013

Vintage Roses


On the spur of the moment, my friend and I decided to do our nails Friday night. She decided to do a spun sugar mani while I opted for some roses. (Another one of our friends was checking up on the residence halls and decided to join in too. Her nails are looking pretty good~ ;) ) I used Copy That, Copy Cat's tutorial. Although it's very simple, I found it very helpful. Of all rose nail art tutorials I've seen and tried to replicate, CTCC's gave me the desired results. This first attempt at roses was very successful, if I do say so myself! :D

I used 2 coats of Julep Robin for the base, Revlon Really Rosy and Sally Hansen White On for the roses, and Orly Lucky Duck for the leaves. After waiting for the leaves to dry a little, I used Seche Vite Fast Dry Topcoat. (It was around 4 am when I finished, and I really wanted to sleep! This mani took me so long! D: By the way, that topcoat really is magical.) To make the rose petals and small leaves, I used the second smallest and the skinniest MASH dotting tools, respectively. I got the dotting tools from Amazon. They're good quality and do the job well. 


I was striving for a vintage look, and I think the polish colors I chose bought about my vision well. These pictures also helped make my mani look more so. Mission accomplished! :D

See you guys on the other side of the day!

Michelle

Friday, February 15, 2013

Zoya Elisa


Zoya Elisa

Elisa is a gorgeous red metallic. It's vibrant and glowy, much more than pictures show. 2 coats. The formula was fabulous; it was very pigmented and glided on. No effort at all! Dried with a nice shine and in an average amount of time. Definitely use basecoat and make sure to remove Elisa off completely or you'll get redder-than-usual nails! Now, I'm not really into reds, but Elisa is enchanting!

See you guys on the other side of the day!

Michelle

Wednesday, February 13, 2013

Julep Maven February 2013 "Bombshell" Box with Add-Ons

Sort of a short review today! I'm up to my neck in untried polishes, but I'm still doing my best in reviewing them. (Also, my upper division science courses are having fun killing me right now.) For the most part, I was really happy with my "Bombshell" box and add-ons. Helen is a pretty color, but makes my hands look dead. Boo! :( I also prefer my holos to have a stronger linear effect to them, but to each her own! The subtleness makes them work-friendly, particularly Ginger. (She also looks great on!)


Julep Ginger

Ginger is a nude-beige with subtle linear holo, which becomes more apparent when dried. 2 coats. Very pigmented and had a great formula. I advise you not to use a regular basecoat because I found it was prone to dragging. But if you absolutely must use a basecoat, apply lightly. Nice dry time.


Julep Laura

Laura is an olive khaki creme. 2 coats, though the first was somewhat sheer. Ok formula: flowed on nicely, but was prone to dragging. Use a light hand to apply. Dries shiny, but slowly.


Julep Rebel

Rebel, the one named after Rebel Wilson (who starred as Fat Amy in Pitch Perfect), is a silver with subtle linear holo. Again, the holo is more apparent when dried. 2 coats. Formula was much like that of Ginger: pigmented, but can drag if not carefully applied and if a regular basecoat is used. Rebel's holo was more visible than Ginger's. In general, I find silver holos show off the holographic effect the best/easiest. Average dry time.


Julep Helen

Helen is a smoky lavender creme. It's a pretty color, but like I said, doesn't work for me. It'll probably look better on those with a darker skintone. 3 coats. The formula was creamy and a bit thick, but was still fairly easy to apply. Doesn't level out too well as streaks are still somewhat visible. Dried shiny, but slowly.

I still very much enjoy Julep Maven, and I think their customer service has been steadily improving. They always strive for customer satisfaction, even creating "Maven's Choice" boxes the past several times. As they're growing, they're also improving their products. Their brushes are now more of the flat type and the bottle caps click when fully fastened and have swatch stickers on them now. (The latter is pretty dumb though since you can't even swatch!) If you'd like a go, then please click on the "I'm a Classic With a Twist" button on the right side bar. It links to my referral link. (Also, please let me know if the code still works! Thank you!) There's no obligation, and you can cancel at any time. If you'd like to skip a month, make sure you log on and do so before the 20-24th day-of-every-month window closes! Mavens also get treats like the Secret Shop, discounts, and free shipping.

See you guys on the other side of the day!

Michelle

Wednesday, February 6, 2013

Orly Glitz and Glamour


Orly Glitz & Glamour

Glitz & Glamour is a very shimmery, reflective flakie-foil yellow gold. I had a really fun time admiring it in the sun! :D I used 3 coats to make sure I covered up any patchy areas, but you can get away with 2 coats. The formula was really nice; I had no trouble applying Glitz & Glamour at all. However, it had a slow dry time. I purchased this to kill my OPI Goldeneye lemming. Judging from swatches online, Glitz & Glamour is a warmer and much denser gold flakie-foil. Spit & Polish has a really nice comparison post of the two polishes!

There won't be any more posts this week. :( I cut my nails too short so some of my fingertips feel a bit sore. I was hoping to swatch more of my untried polishes, but I guess it'll have to wait until next week!

See you guys on the other side of the day!

Michelle

Monday, February 4, 2013

Urban Outfitters Green Holo


Urban Outfitters Green Holo

Green Holo is a light green holographic. Depending on the lighting, it looks light blue. For the most part though, it's so holographic that you can't tell precisely what color it is. (Which is an awesome thing in my book!) I used 2 coats here, with a basecoat. In retrospect, it was a poor decision because I had to be careful going over patchy areas while the polish was still wet since the brush would pick up some of the polish. For all intents and purposes, wear Green Holo WITHOUT a basecoat. (I hear water-based basecoats are okay though.) Fortunately, the basecoat had no effects on the formula as it still applied smoothly. The dry time was slower than average. I didn't dare apply topcoat lest the holo dulled. Even with all the kinks, I LOVE GREEN HOLO. So, yeah. This stuff is pretty magical. (Would look more so, but I didn't have any sun when I did these swatches.)

In the last three photos, you can see the light green base color better. It's still MUCH more holo than what pictures show though.


What do you think about Green Holo? Are you glad that holos are trendy again and more available now? (In my opinion, they should have never left. I blame American safety regulations...)

See you guys on the other side of the day!

Michelle
P.S. I'm not the only one who needs a pick-me-up on Mondays, right? Holos for the win!

Friday, February 1, 2013

L'Oreal Owl's Night


L'Oreal Owl's Night

YES, this is THE Owl's Night! It is a dark brown creme with gorgeous gold shimmer that flashes copper and green at certain angles. Now I know why it was so elusive when it was released! I used 3 thin coats here, but you can get away with 2 thicker ones. I mistakenly thought it would be sheer and need buildup so I used thin coats to avoid thickness. Owl's Night had a nice formula and I encountered no problems during application. It dried with a nice shine and the dry time was average. The one thing I didn't really like was that the brush was a little too wide for my pinky. (Then again, I have small nails...) I was expecting a brush like that of L'Oreal's Colour Riche nail polish line. It's really a minor thing though. And if you were thinking it, then yes! I killed ANOTHER lemming! :D (I dare call this lemming week!) I purchased this and Sonia Kashuk Fairy Tale from the same blog sale.

What do you think of the elusive Owl's Night?

See you guys on the other side of the day!

Michelle